Add an Employee
This guide will teach you how to add an employee and completely configure an employees settings.
You can also import employees from an existing system. Review our Export Employees from Previous System guide for more information.
Navigate
Menu > Settings > Employees
Add new employee
On the Employees page, click the Add Employee button to bring up the Add Employee/User window.

Fill in the Add Employee/User Form. All details are required if they are available.
Enter their Given Name and Surname, accurate and official details are required to use STP.
An employee username will be automatically generated which can be changed in the same field. This username is used to log into Microkeeper and cannot be changed after the user is created.
Enter either the Email or Mobile number or both to send the login credentials to the employee. Alternatively, login details can be sent at a later time through the Employee page.
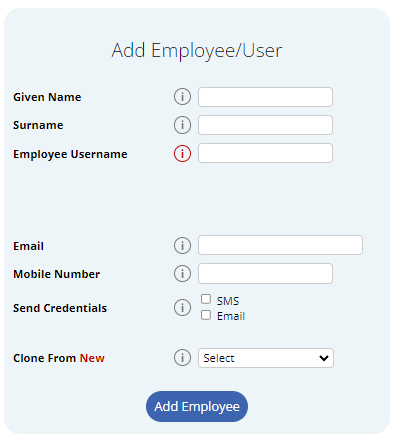
Clone From
This quick configuration tool can be used to clone details from a similar existing user.
Included in clone:
- Manager Config
- Group Config
- Employee Profile:
- Payment and Employment
- Entitlements
- Employee Display
- Employee Clocking
Employee Welcome letter
Once you have added all your employees, you can produce a welcome letter that will introduce them to the Microkeeper system and inform them of their username and default password.
Navigate to Menu > Settings > Employees
Click the button and Send Email to Everyone button to send a welcome letter to everyone who has never received a welcome letter.
The welcome letter can also be sent out on a selective basis.
- Select the tick box next to an employees username
- Click the button
- Select either SMS or Email
Complete configuration
When an employee is first added to the Microkeeper system, default values are pre-selected, this gives the employee the ability to starting clocking their hours.
Before their first payroll can be processed, the configuration of the employees account must be completed.
Navigate to Menu > Settings > Employee - Edit (For the newly added employee)
The configuration of the employee can be done as required.
The info dots i will explain settings in detail.
Note: It is recommended getting a bookkeeper or someone with an accounting background to help with the initial configuration. Additional Microkeeper offers guided training sessions