Author Dylan Wong@Microkeeper
Category Timesheet
Last Modified 04/04/2025
Timesheet data can be uploaded via CSV through the "Import CSV" button on the Timesheets vs Roster page.
Prepare your CSV file formatted with columns in the exact order mentioned (for any optional fields, leave as blank):
- Employee (Required): This field can be populated using the employee's Username, Payroll ID, Employee ID, or Employee Name. Microkeeper will attempt to match the record using any of these identifiers
- Date (Required): The date for the timesheet entry
- Start Time (Required): The beginning time of the work period
- End Time (Required): The concluding time of the work period
- Location (Optional): The workplace location
- Role (Optional): The specific role of the employee for that timesheet entry
- Job (Optional): This can be identified by the JobID, Third Party ID, or Job Title. Microkeeper will attempt to match the record using any of these identifiers
- Break (Optional): This field requires the break duration in minutes. Microkeeper will search for a selectable break rule with the same duration and apply it
- Note (Optional): Any additional information or context you want to provide for that particular timesheet entry
| Employee Identifier | Date | Clock On (24 hour) | Clock Off (24 Hour) | Location ID | Role ID | Job | Break (Minutes) | Note |
| john_smith | 01/01/2024 | 09:00 | 17:00 | 2233 | 5566 | Melbourne Restaurant | 30 | Started Late |
| jane_doe | 06/01/2024 | 11:00 | 19:00 | 4565 | 0 |
Uploading the Timesheet Data File
Navigate to Menu > Rosters > Timesheets > click Import CSV and select your csv file.
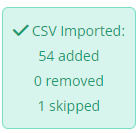
You are looking for a confirmation message towards the bottom of the page that should say there was a number of CSV Imported like below:

If you get an error message in the yellow box that states a name cannot be matched, it means that the name inside the CSV file did not match the names in Microkeeper. The CSV file should be updated to match the name in Microkeeper.
