Roster Calendar
The Roster Calendar is used to create scheduled planned hours of work for your employees.
Navigate
Menu > Rosters > Roster Calendar
How to create a rostered shift
Selecting the roster week and configuring the filters
First select the year and week to roster for. Dates are organised by the fiscal year and week.
Once the date has been selected, further filters can be set below the data filter.
- Locations - select the location/s to display. You must select at least one Location to begin rostering
- Employees (optional)
Then under the filter button you also have: - Days (optional) - the days to display can be selected
- Show Graphics (optional) - the 24 hour visual breakdown can be hidden
- Show Costs (optional) - roster costing can be hidden
- Shift Status (optional) - specific shift status can be selected
After the filters have been finalized, click the button to begin rostering.
Create a new rostered shift
The Locations selected and any associated Roles will be visible.
Click the + button below the Location/Role you wish to create a rostered shift for.
A new empty rostered shift will appear. From here, details for the rostered shift can be entered.
To configure a rostered shift, you will need to provide:
- Employee: Select the employee assigned to the shift.
- Start: Enter the rostered start time of the shift.
- End: Enter the rostered end time of the shift.
Other configuration options are optional. Below is a full breakdown of the rostered shift area
Shift input area breakdown
- Add a new shift
- Delete the shift
- Drag a shift up or down
- Allocate an employee to the shift
- Start time of a shift
- End time of a shift
- (optional) Start time of the shifts break
- Job selection for the shift (NA when not applicable)
- Notes for the specific shift
- Hide the specific shift from employees roster review
- Highlight the Location and day (Mark it important)
- Copy the specific shift
- Bulk select Job for the Location/Role
- Bulk add notes for the Location/Role
- Bulk hide shifts for the Location/Role
- Location name
- Role name
- Select Single Shift
- Select all shifts for Location + Day.
Bulk Modifying Shifts
To update multiple shifts at once, tick the box on the right hand side of the shift input area.
Then click Copy, Delete, or Time.
Copying a Shift
To copy multiple shifts:
- Select the shifts using the check box on the right
- Click Copy.
- Click the Paste button under the Location/Role you want to paste the shifts into.
Deleting a Shift
To Delete multiple shifts:
- Select the shifts using the check box on the right
- Click Delete.
- Click Okay.
Bulk Changing Shift Times
To change shift start time or end time
- Select the shifts using the check box on the right
- Select the Time Button
- Select whether the shifts Start Time is changing, End Time is changing.
- Enter the new time
- Click Apply
Bulk Phasing Shifts
To Phase shifts forward and backwards:
- Select the shifts using the check box on the right
- Select the Time Button
- Select Phase Shifts
- Select Backwards or Forwards
- Enter the number of hours the shifts are to be adjusted by
- Click Apply
Graphical Breakdown
Rostered shift will also display a 24 hour graphical breakdown of the shift.
The graphic will display the duration of the shift on a 24 hour timeline including any Break Rules that will apply.
A full Graphic Area breakdown:
- Weekly rostered total hours for the employee
- The light red area indicates times of day an employee has set their unavailability to work
- Clash with unavailable hours
- 24 hour graphical representation of the shift
- Change of colour indicates a multiplier change in pay rate
- Total hours for the rostered shift
- Total cost for the rostered shift
- Total hours for the entire Location/Roles rostered shifts
- Total cost for the entire Location/Roles rostered shifts

Unavailability on the Roster
There are 3 types of unavailable hours that will be displayed on the roster.
All unavailable hours are displayed in pink on the roster. If a set shift clashes with the unavailable hours it will be highlighted red.
Mouseover the pink areas to see why an area has been marked as unavailable.

1. Weekly availability
In each employees profile you can set their available work hours.
For example every Saturday morning James plays football. We can enter this into his available hours.
If we roster him on during this time a clash will be displayed.
We might choose to roster someone else on or we might know James has a bye this week and choose to ignore the clash.
2. Previously set shifts
If an employee is rostered on from 8 to 12 then they will be made unavailable during that period for all other shifts.
If we try and roster them on during that period, a clash will be displayed.
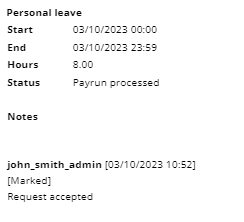
3. Leave requests
An employee can request time off (annual leave, sick leave or unpaid time off). Leave requests will be displayed on the roster.
If you roster the employee on during their leave period a clash will be displayed.
Leave requests will only be displayed on the roster calendar.
Budgeting for roster
You can set a budget or hours goal for your roster template or roster calendar.
Roster budget
If you know how many hours it will take to complete a particular job you can aim for that.
The cost goal can be a budget target for a department or can be a projected income of the business.
With a target budget you can aim for a cost percentage less than 100% of the budget.
If a projected income is entered the cost percentage will be the employee wages as an expense of the business, example 35% might be a goal.
| The hide costs filter can be used to show/hide cost. This can be restricted to selected employees. |
Finalising a Roster
Finalisation of a roster is done by locking the roster from changes.
Once a roster has been locked, changes to the roster is disabled.
To lock the roster, click the dark blue Lock button on the top right of the Roster Calendar page
Employees will be able to access the week's roster once it has been locked.
Unlocking the roster will remove access for the employees and make the roster editable once again.
Push notify employees
A push notification can be sent to rostered employees to let them know the roster is available.
This will be sent to any employees who have the Microkeeper app installed on their mobile device
To do this go to More Actions on the Top Right, and select Send Notifications.
Click "All Rostered Staff" button to send a push notification to all rostered employees.
Alternatively, click the blue "Changed" button to send a push notification to employees who have had their rostered changed in the current session.
Then make sure the check boxes reflect how you want to notify staff and then click Send.
A Notification that their Roster will be sent to their mobile device

Cloning the Roster
A roster can be reused in future weeks with the clone tool.
Go to More Actions, and click Clone Week.
A new window will open asking you to select where to clone the selected roster to:
Calendar - select the fiscal year and week
Template - Name and clone to a new template or overwrite an existing. More on Roster Templates from our guide here.
When you've selected which Calendar Week or Template to be cloned to click the Blue Clone button.
The roster will now be cloned to the selected week/template
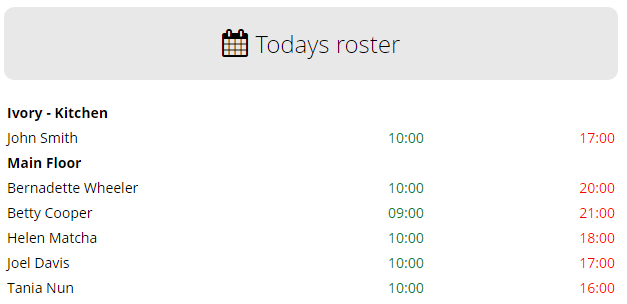
Viewing Current Day's Roster
Navigate to Menu > Home > Control Panel
Roster manager's can view a locations roster on the Control Panel.
Exporting the Roster
There are multiple options for exporting a roster out of Microkeeper from the Roster Calendar page
Navigate to Menu > Rosters > Roster Calendar
Dynamic Print Display
Click the More Actions option in the top right and use the menu to select the Calendar View option to open the Dynamic Print Display roster customisation page.
The Dynamic Print Display offers several options to customise your roster view:
- Change the date range and which days to display
- Select specific locations to inclkude
- Choose what information to show (hours, positions, contact details, etc.)
- Merge locations or roles for a consolidated view
- Toggle between employee-based or location-based layouts
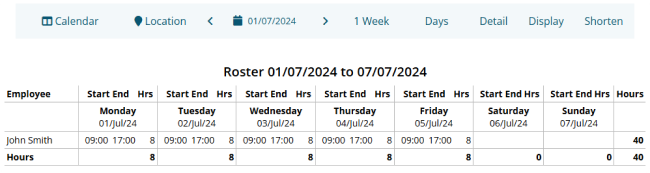
Configure the display options using the toolbar buttons at the top:
- Location: Select which locations to include
- Range: Choose the date range (1day to 6 weeks)
- Days: Select which days of the week to show
- Detail: Configure merge options and availability display
- Display: Choose which columns and information to show
- Shorten: Adjust text length for various fields
To export the customised roster:
- Configure the display options as neeeded
- Press Ctrl+P (Windows) or Command+P (Mac)
- Choose to print or save as PDF
Static Print Display
Click the More Actions option in the top right and use the menu to select the PDF Export Version you want to Generate
Press Ctrl+P (PC) or Command+P (Mac). This opens the Printing window. A preview of the printed version of the page will appear.
Select a specific printer or Save as PDF