Over the years we’ve seen first hand the benefits time clocking using a fingerprint scanner can bring to a business. A quick, easy and secure clocking method, it allows a high volume of employees to efficiently start and finish their shift as scheduled. And means clocking data is ready when you are, to approve and process your payroll.
However, as with all workplace equipment there can be some maintenance needed to ensure it keeps running smoothly. And so, over the years we have also seen issues that can arise through improper usage, maintenance or tampering.
These actions can result in either a cloudy or scratched lens (pictured below). Making the scanner unable to properly read a fingerprint.
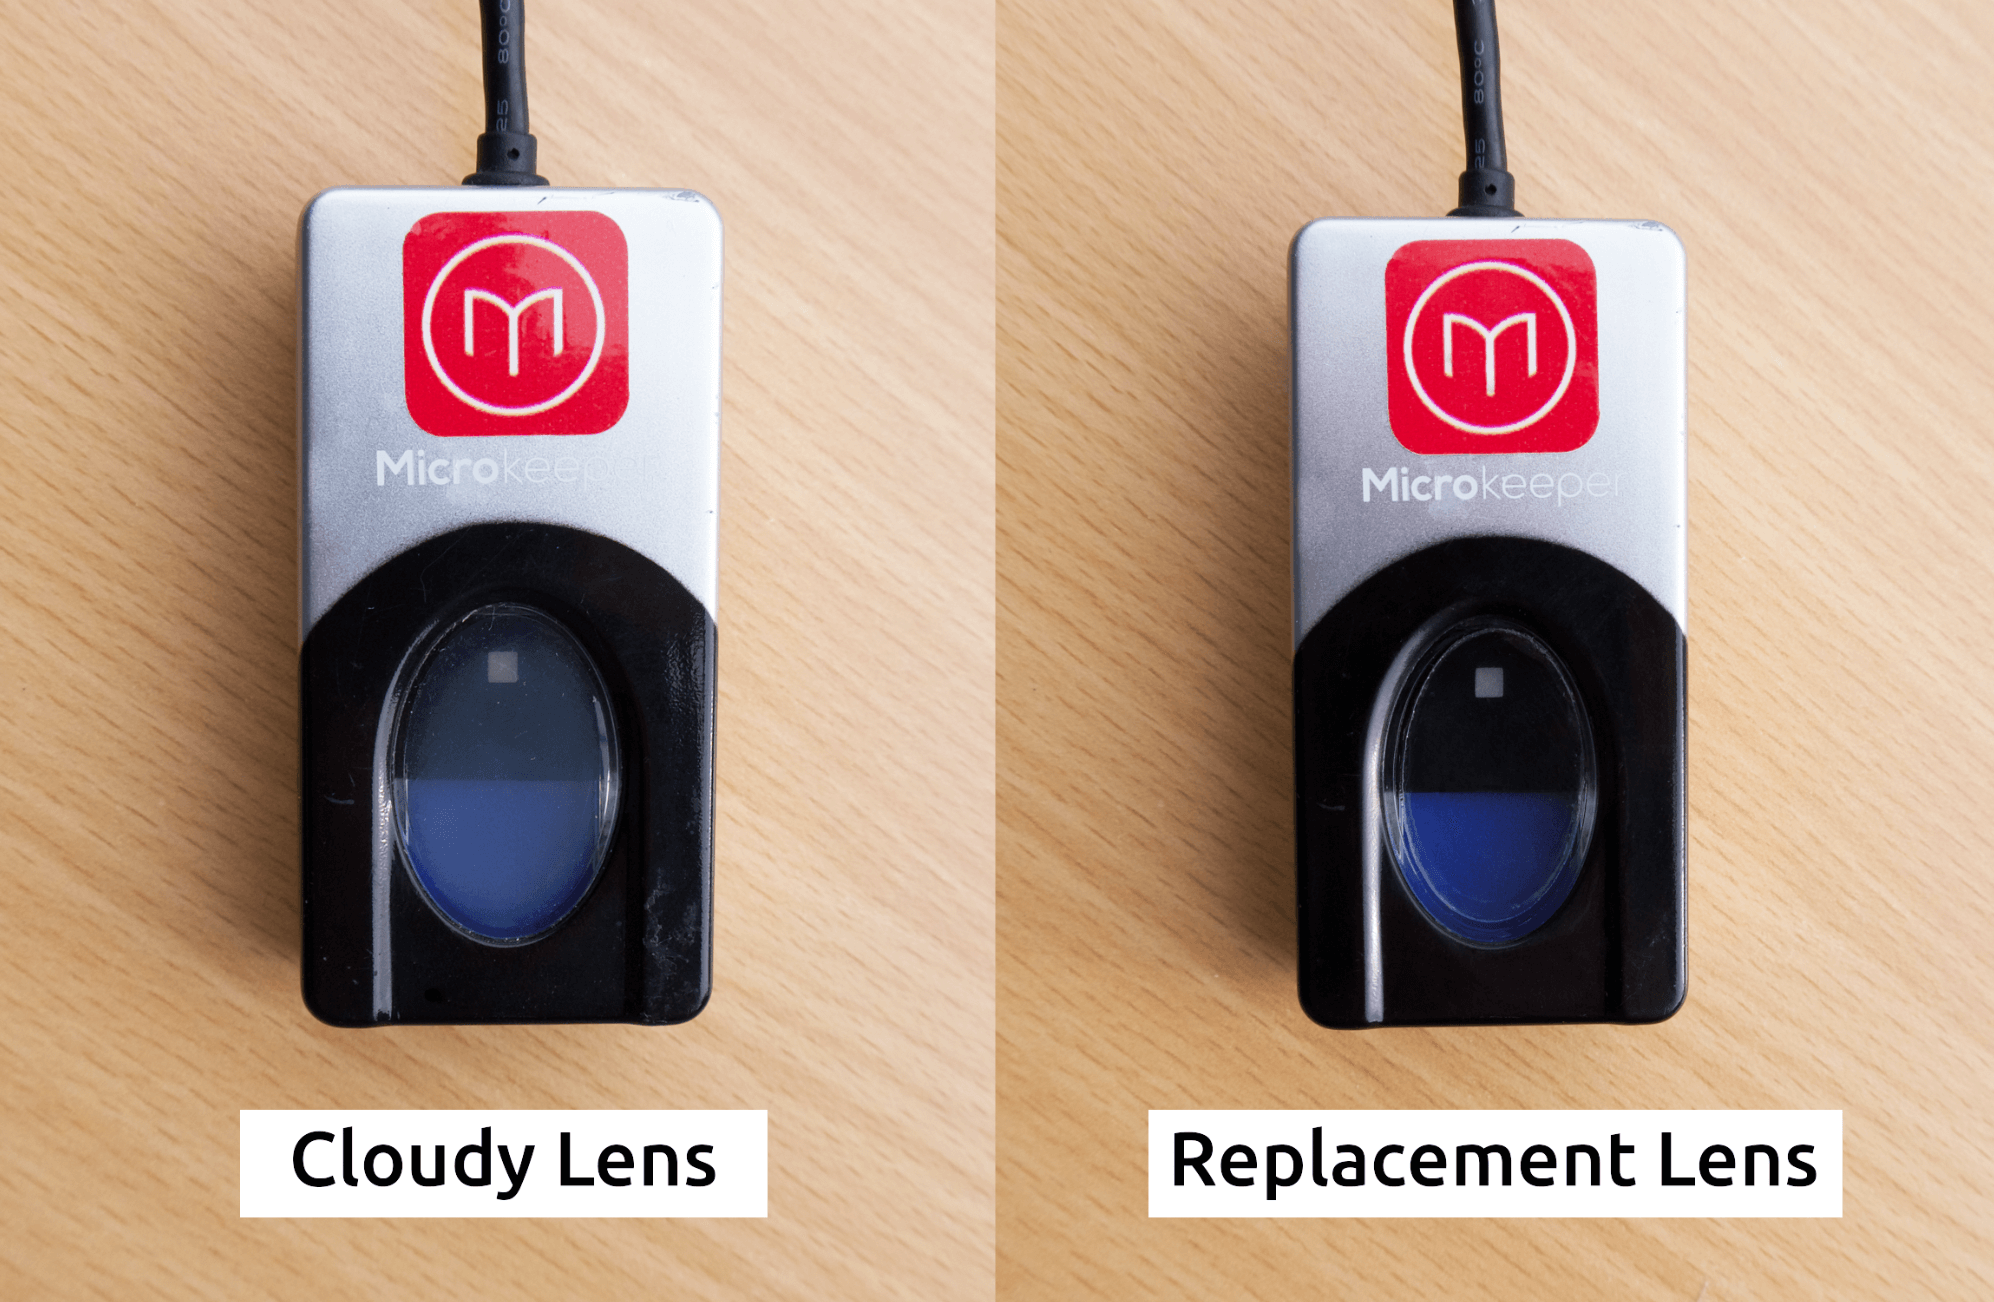 Left: Cloudy/Damaged lens Right: Replacement lens
In order to avoid the expense and wastage of replacing the whole scanner we have developed an easy solution to repair the lens yourself. The Microkeeper Fingerprint Scanner Lens Repair Kit, includes a few simple tools to remove and replace the damaged lens and get your staff clocking back on and off in no time.
Watch our instructional video to see how to use the kit or read the steps listed below.
The Microkeeper Fingerprint Scanner Lens Repair Kit
The kit includes the following items:
- 2 lens replacements
- 2 cotton balls
- 1 pair of latex gloves
- 1 wooden tool
You will need to supply:
- Acetone free nail polish remover, eg from Woolworths or Coles
- Paper towel (1 square)
Please note: this repair kit is designed to resolve the issue of a cloudy or scratched lens. If this damage is present it will be visible on the lens.
If there is no visible evidence of a damaged lens there could be another issue and it's important to rule this out first. Please read the ‘Troubleshooting your fingerprint scanner’ section further below.
How to replace a cloudy or scratched fingerprint scanner lens:
Instructions:
- Set yourself up on a clean work surface. Make sure the area is free of dust, adequately ventilated and well lit.
- Put the latex gloves on.
- Soak the cotton ball with some acetone free nail polish remover, place over the fingerprint scanner lens and hold down for at least 30 seconds.
- Remove the cotton ball and with the flat end of the wooden tool make a slight incision into the damaged lens.
Be careful not to scratch the surface below. Work your way around the outer corner of the lens to loosen it, eventually lifting the whole lens from the surface of the fingerprint scanner. - With your acetone free nail polish remover soaked cotton ball, wipe away all traces of the original lens.
- Continue to clean the surface, as required, of all remnants of the original lens. Using the paper towel to dab dry any excess acetone free nail polish remover.
- Using the pointed end of the wooden tool remove any fine lens debris from around the rim, followed by cotton ball wipe and paper towel dab dry.
- Ensure the entire fingerprint scanner surface is dry and free from any contaminants.
- Remove and discard your gloves.
- Peel a lens replacement from its backing sheet, using the side tabs to hold onto it.
- Stick down on to the oval window where the previous lens used to be. Firmly press down and rub to ensure adhesion.
- It's very important not to touch the adhesive side of the replacement lens or the cleaned scanner window, as to not leave your own fingerprints.
Troubleshooting your fingerprint scanner
Cleaning the fingerprint reader
Your scanner may not be permanently damaged, just dirty.
The condition of the fingerprint reader affects its ability to obtain a good quality scan of a fingerprint. To maintain the fingerprint reader, the oval window should be cleaned periodically as follows:
Press the sticky side of a piece of adhesive cellophane tape across the oval window, and then peel it away.
Alternatively, dampen a cloth with warm water and gently wipe the oval window.
- Do not rub the oval window with an abrasive material, including paper.
- Do not poke the oval window coating with your fingernail or with any other item, such as a pen.
- Do not submerge the fingerprint scanner in liquid.
- Do not spray liquid on the fingerprint scanner or allow liquid to drip inside.
- Do not use the fingerprint scanner if it has incurred damage such as a cracked or frayed cord or broken connection.
If you're unsure, consult a Microkeeper team member before cleaning.
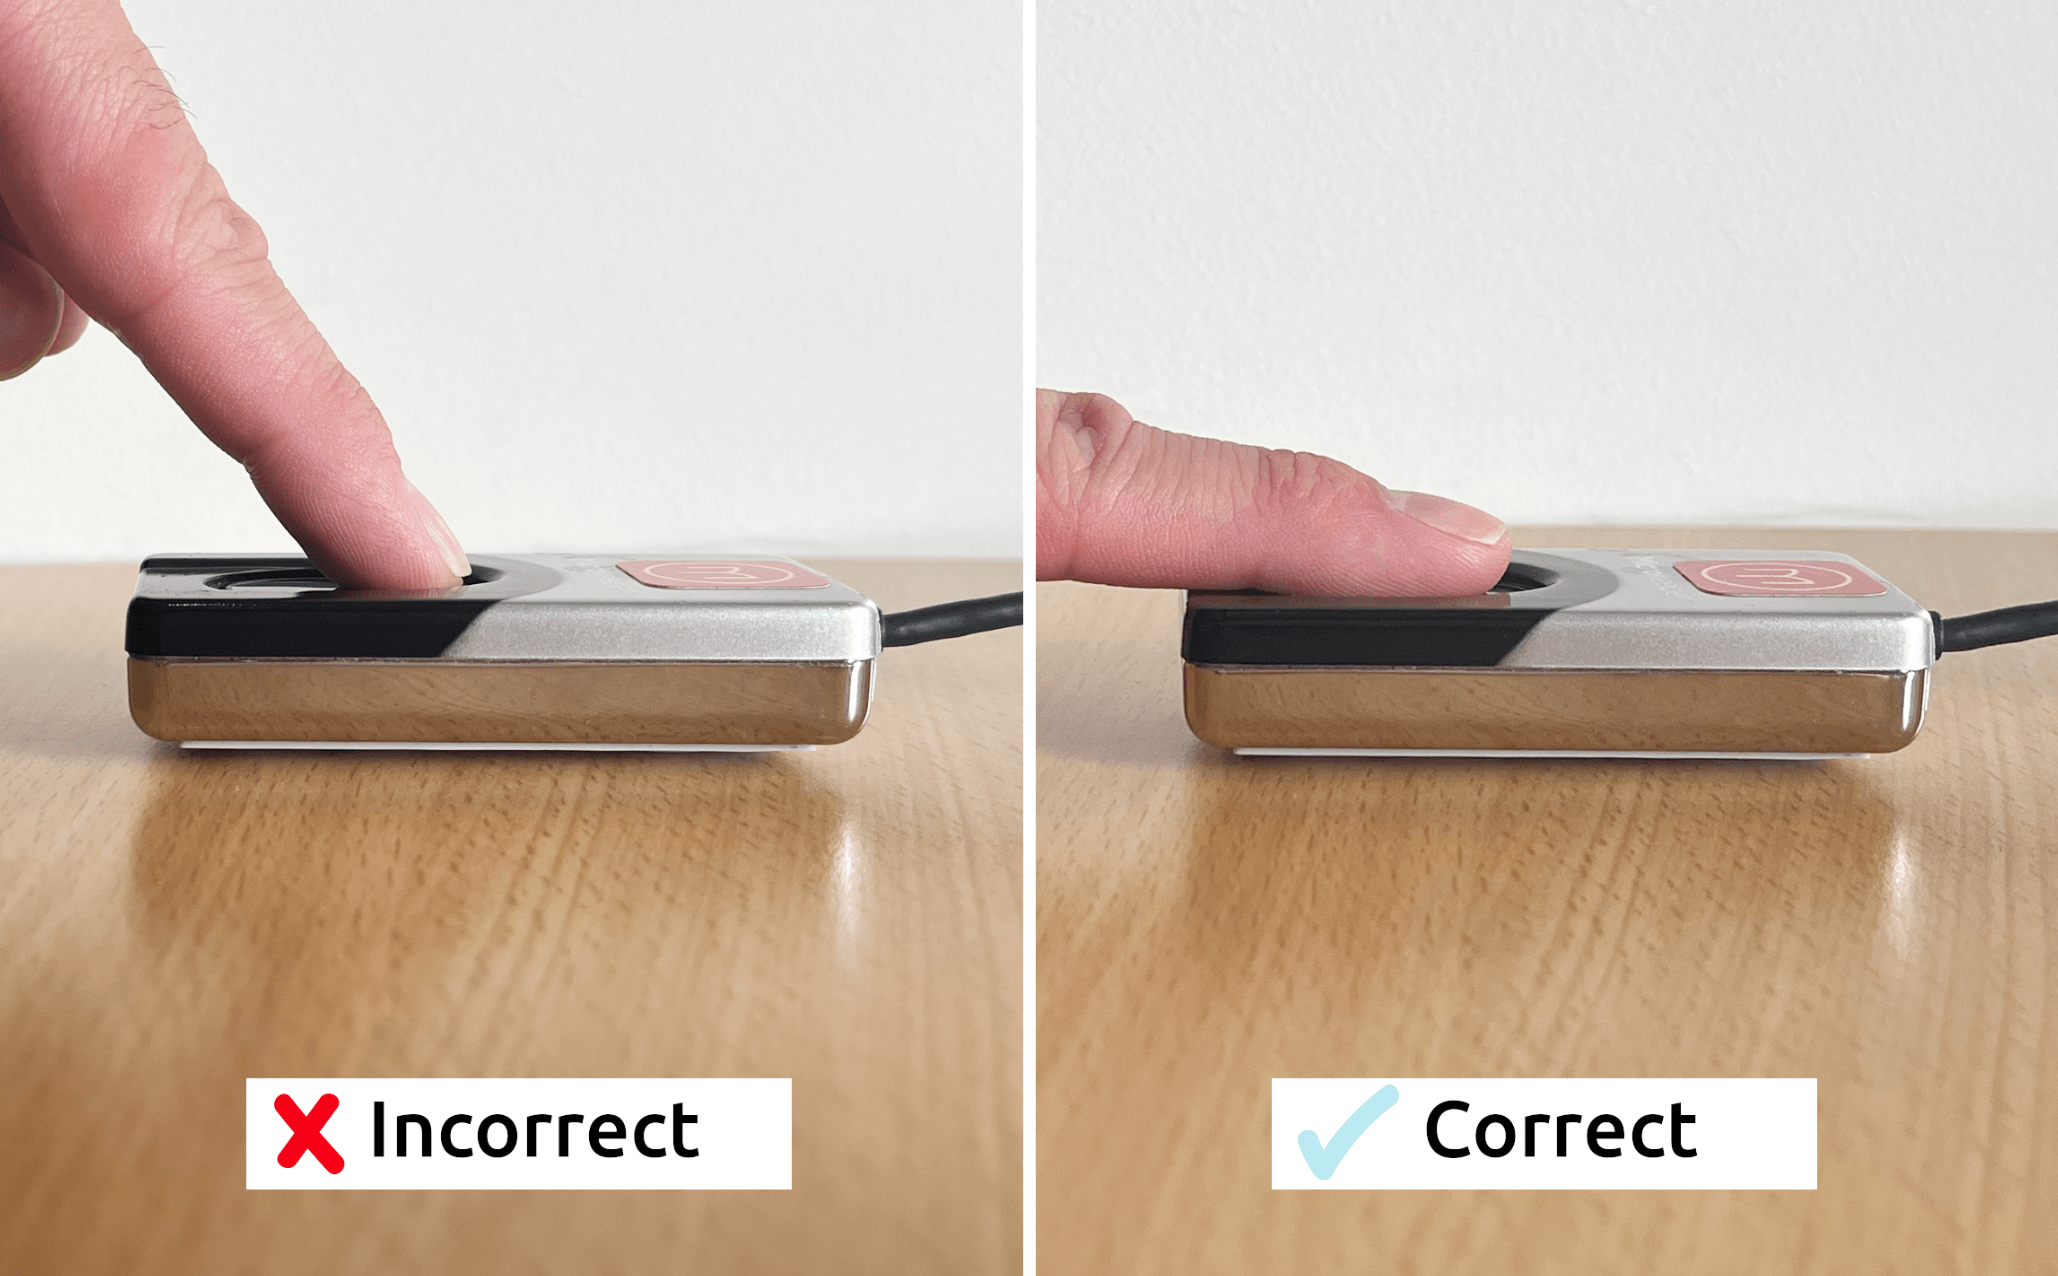
Are you using the fingerprint scanner correctly?
For comfort and reliability, it's recommended that you use the index finger of either hand.
To ensure proper use of the fingerprint reader when enrolling your fingerprints or when authenticating yourself using the fingerprint reader, perform the following steps:
- Place the entire pad of your finger - not just the tip or the side of your finger - on the centre of the oval window of the fingerprint scanner.
- Apply steady, even pressure on the oval window. Do not roll or swipe your finger.
- Hold your finger on the oval window until you see the light under the window blink.
This indicates that the fingerprint scanner has read your fingerprint. - When the light blinks, lift your finger from the oval window. If the fingerprint scanner reads your fingerprint, as indicated by the blink, but the Microkeeper software does not authenticate you after several attempts, try
re-enrolling your fingerprint.
Eliminate any other issues:
Is the scanner connected and working properly? Check cord connections are plugged in correctly. If the device is connected the blue light will be visible.
Who is this issue affecting? If only a few employees are experiencing difficulties but others can still successfully register their fingerprint, try re-enrolling the affected employees.
Prevention
To avoid future damage to your fingerprint scanner:
- Ensure employees have clean, dry fingers prior to use.
- We recommend using hand sanitiser after clocking on/off rather than before
- Do not use abrasive materials or harsh chemicals when cleaning your fingerprint scanner
- The fingerprint scanner should be kept in a relatively clean environment where contaminants such as paint splashes, dirt, food etc. will not end up on the fingerprint scanner lens.
Other options...
If you have replaced the lens and it's still not working, or you're reluctant to attempt a self repair you can send it in and one of our Technical Specialists will take a look at it and repair inhouse.
In the event that your fingerprint scanner cannot be repaired due to user error, you can purchase a replacement.
Alternatively, you may want to consider one of our alternative clocking options such as NFC tag/reader or facial recognition, that may be better suited to your workplace conditions.


.jpg)