Deduction and Expense Rules
Deduction and expense rules are used to create rule automating deductions on the employees payslip.
Navigate
Menu > Settings > Payroll Rules > Deduction Rules
Why create Deduction Rules?
After every Payrun Microkeeper can generate an ABA file that can pay all your employees and their wage deductions in one go.
Deduction rules can be used for:
- Employee salary sacrifice
- Employee after tax super
- Gym membership
- Giving to charity
- Repaying a loan
- Child Support
- etc
This is automatically done when payroll is processed.
Creating a Deduction / Expense rule
- Click Create New Rule
- If applicable, select an auto-fill option. Example: Child Support, Charity, Super Sal Sac
- Complete the form and select Add New Rule
Other Important Terms
| Deduction | Calculated after tax |
| Expense | Calculated before tax |
| Fixed or Percentage | A deduction can either be set as a Fixed amount, Percentage of Gross CTB or Percentage After Tax |
| Child Support PEA | Protected Earnings Amount. An amount that is protected from a Child Support Deduction. This amount is updated on the first day of each year and is maintained by Microkeeper |
| Child Support 72A | Clause 72A means PEA does not apply, the DHS (department of Human Services) will let the employer know if this clause applies. |
Below is an example of how this form could be filled.
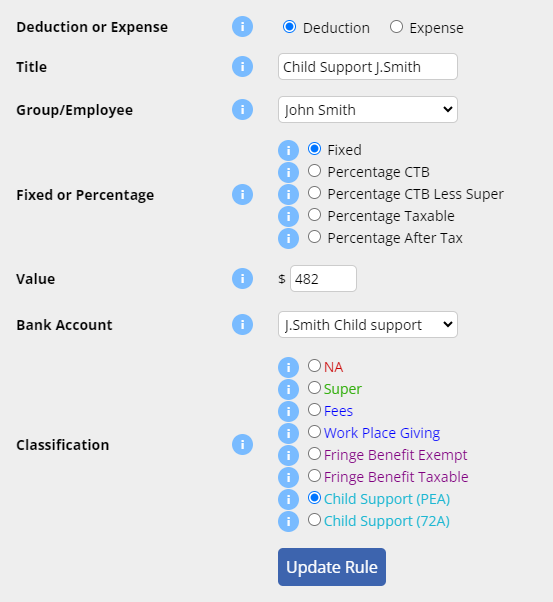
Child Support example
John has a Child Support payment of $482 per week.This needs to be deducted from his weekly pay, taking into account protected earnings, and paid directly to the DHS.
- Deduction or Expense: Select Deduction.
- Title: This will be the Payslip Title that appears on the employee's payslip. For example "Child Support J.Smith"
- Group/Employee: Select the Employee affected. For example "John Smith".
- Fixed or Percentage: Select "Fixed".
- Value: Change this value to the desired amount. In this example "482"
- Bank Account: If you wish for the deduction to included in the ABA file, the deduction can be automatically paid to the account selected.
- Classification: Select either PEA or 72A. In this example "PEA".
Child Support PEA = Protected Earnings Amount. An amount that is protected from a Child Support Deduction. This amount is updated on the first day of each year and is maintained by Microkeeper
Child Support 72A = Clause 72A means PEA does not apply, the DHS (department of Human Services) will let the employer know if this clause applies.
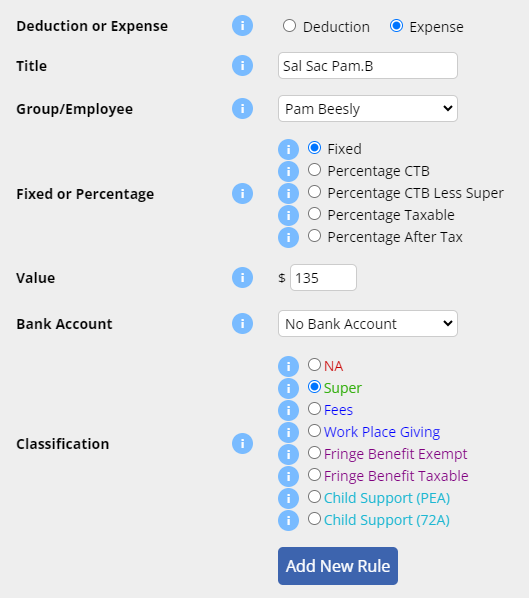
Salary Sacrifice example
Pam has a before tax Salary Sacrifice of $135 per week.
This is paid into her super fund automatically.
The payment should go through a clearing house as a Salary Sacrifice
The configuration for the example above:
- Deduction or Expense: Select Expense.
- Title: This will be the Payslip Title that appears on the employee's payslip. For example "Sal Sac Pam.B".
- Group/Employee: Select the Employee affected. For example "Pam Beesly".
- Fixed or Percentage: Select "Fixed".
- Value: Change this value to the desired amount. In this example "135"
- Classification: Select "Super".
click the "Add New Rule" button.
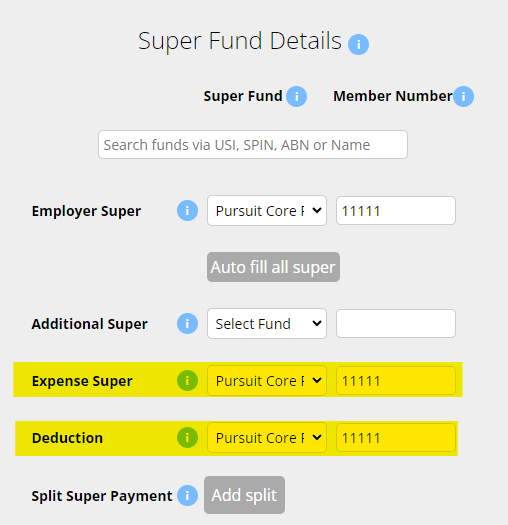
The desired Super Fund for this deduction will need to be assigned in the Employee's Profile:
- Settings > Employees
- Click Edit next to the employee's name
- Scroll down to Super Details section
- Select the desired super fund and enter the Member Number in the Expense Super/Deduction section
Hint: If the superfund is the same for SGE and salary sacrifice, use the Auto fill all super button to quickly fill all the fields with the same fund details.
Use the i for more information on a field.
Please note, any changes to Shift / Rate rules must be confirmed by the delegated Payroll Officer.
Creating a Bank Account to assign to a Deduction rule
For a Deduction such as Child Support to be allocated to a Bank Account, the bank details must first be entered into the Bank Details section.
Menu > Settings > General > Bank Details
1. Click Add Bank Account
2. Fill in the form accordingly
APCA Code - If the bank account is to be assigned to a Deduction Rule, enter 0 as the APCA code.
Reference This is the reference ID that will appear on bank statements. If the bank that is receiving payments needs to know from whom specifically the payment is coming from then multiple Bank Detail records will need to be made each with a unique reference ID.
Example: For Child Support payments to the DHS, create a Bank Detail record for each staff that pay child support with the unique Reference ID supplied by the DHS in the reference section.
3. Once complete, click Add Bank Account
Now that the bank details have been created, they can be assigned to a deduction rule.