Grouping Employees
Groups can be created to organise and managing users efficiently within Microkeeper. In this guide we walk through setting up and managing employee Groups.
Navigate
Menu > Manage > Groups
Why group employees?
There are many reasons you would want to group your employees, here are a few examples:
- Roster management: When creating an employee roster we can display all the employees from a particular group. This gives us the ability to see who we have on for the day at each individual store. If a manager is setting the roster for their employees they can display the employees that are important to them.
- Assigning awards or payroll automation to select staff: In an organisation, the employees within can be entitled to different awards. We can create Groups for select employees and attach different awards to groups of specific employees to manage this.
- Performance analysis: Reports can be generated via Groups. Using the Group configuration we can create Groups for departments of staff to easily capture financial reports across an organisation.
Activating the Groups module
If this option is not available you can activate by navigating to
Menu > Settings > General > Global > System Settings - Groups
Change the Groups settings to Groups

Creating a new Group
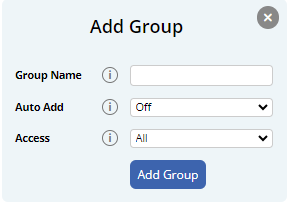
To create a new Group, click the Plus button at the top of the Group List.
A new Add Group window will appear:
- Group Name: Set the name of the new group
- Auto Add: Designate if any new employees will be automatically added to this Group.
- Access: Groups can be limited to different areas:
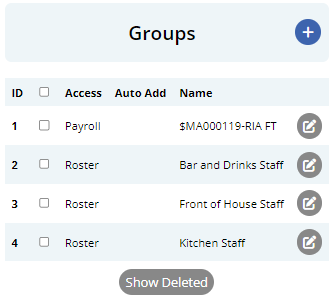
| Group Control | Group Usage | Access required to add staff |
| All | Used everywhere | Settings, Payroll - Read Only |
| Payroll | Used in the payroll modules | Settings, Payroll - Read Only |
| Rosters | Used in non payroll modules | Settings, Rosters |
| Self Managed | Staff can select the Groups they want to be in | No access required |
Allocating employees to Groups
Once a Group has been created, employees can then be allocated to the new or existing Groups.
Select the Group to allocate employees by selecting the checkbox next to the Group name under the Groups list.
Multiple Groups can be configured at the same time.
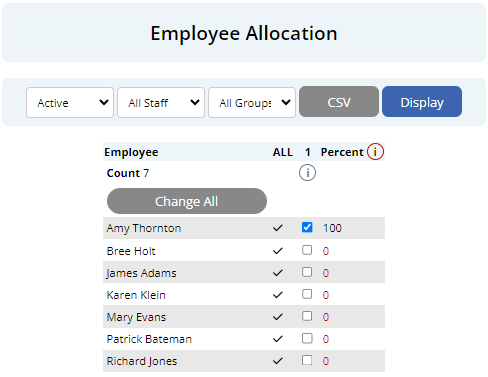
Select the Groups to configure and move to the Employee Allocation and click the Display button to start allocating employees to the selected Groups.
Filters are available to streamline the allocation process -
- Status: Display between Active or Inactive employees
- Employee: Display specific employees
- Groups: Display a specific Group of employees
Select the checkbox to the right of an employees name to assign them to the Group.
You can also use the "Change All" button, to Add or Remove all Staff displayed from the Group as well.
If you are configuring multiple Groups, hovering over the selection box will indicate which Group you are configuring.