Import Staff
Import Staff adds many employees at once, from a spreadsheet such as a staff list exported from your old payroll system, or straight from Xero. To add one employee, see Add an Employee.
| Required plan | All plans |
|---|---|
| Required access | Settings, or Employees - Add/Edit or Employees - Add |
This guide covers how to:
- Prepare your staff spreadsheet.
- Import it and check each column's field.
- Import staff from Xero instead.
- Finish setting up your imported staff.
Before you import your staff
Set up your pay cycles and Locations first, so there are pay cycle and Location Groups to put staff in. See ABNs and Pay Cycles and Locations.
If your staff are in Xero Payroll, you can skip the spreadsheet: see Import staff from Xero. Otherwise, export your staff list from your old payroll or accounting system, open it in a spreadsheet program such as Excel, and save it as a .CSV file, with one row per employee and a heading row at the top.
In your first month, the Microkeeper team can import your staff for you. Contact Microkeeper to ask.
Prepare your staff spreadsheet
Microkeeper matches a column to a field when its heading starts with the field's code, such as "firstname". You can choose any column's field yourself after uploading, so other headings work too.
| Heading | Field | What to put in it |
|---|---|---|
| firstname | Given Name | Required. |
| lastname | Surname Name | Required. |
| For their welcome letter. | ||
| phoneno | Mobile | For their welcome letter by SMS. |
| startdate | Start Date | As dd/mm/yyyy, for example "01/06/2026". Needed for payroll. |
| status | Employment Type | "Full Time", "Part Time" or "Casual". |
| sex | Gender | "Female" or "Male". Super payments are rejected without it. |
| rate | Pay Rate | Their hourly rate. |
| basichours | Ordinary Hours eg 38 | Their weekly ordinary hours. |
| position | Position | Their job title. |
| bulk_GID | Group ID | Their pay cycle and Location Group ID numbers, separated by #, for example "58745#58751". |
You can also import their date of birth, address, tax file number and tax details, up to three bank accounts, super fund and member number, opening balances, next of kin, Employee ID and Primary Manager. Anything you leave out, your staff fill in themselves when they log in.
Warning
Give every employee a start date on or before the last day of your first pay period. Pay runs leave out anyone with no start date or a later one, and the import doesn't warn you.
To find a Group's ID number, see Find a Group's ID for a staff import. List only one pay cycle Group for each employee.
Import your staff spreadsheet
Navigate to Menu > Settings > Employees, click Add Staff, then Import Staff via CSV. The CSV Staff Import page opens.
- Click Auto Unique Username.
- Click Upload CSV and choose your file. CSV Upload Successful appears and your rows are listed.
- Check the field chosen at the top of every column, and change any that are wrong. A column left as NA isn't imported.
- Untick any rows you don't want to add. The heading row is already unticked.
- Click Validate. Microkeeper gives each row a Username.
- Click Validate again. It checks the usernames, and looks for emails, mobile numbers, tax file numbers and Employee IDs already used by someone in your business.
- Under Ready to add Staff, click Submit employees.
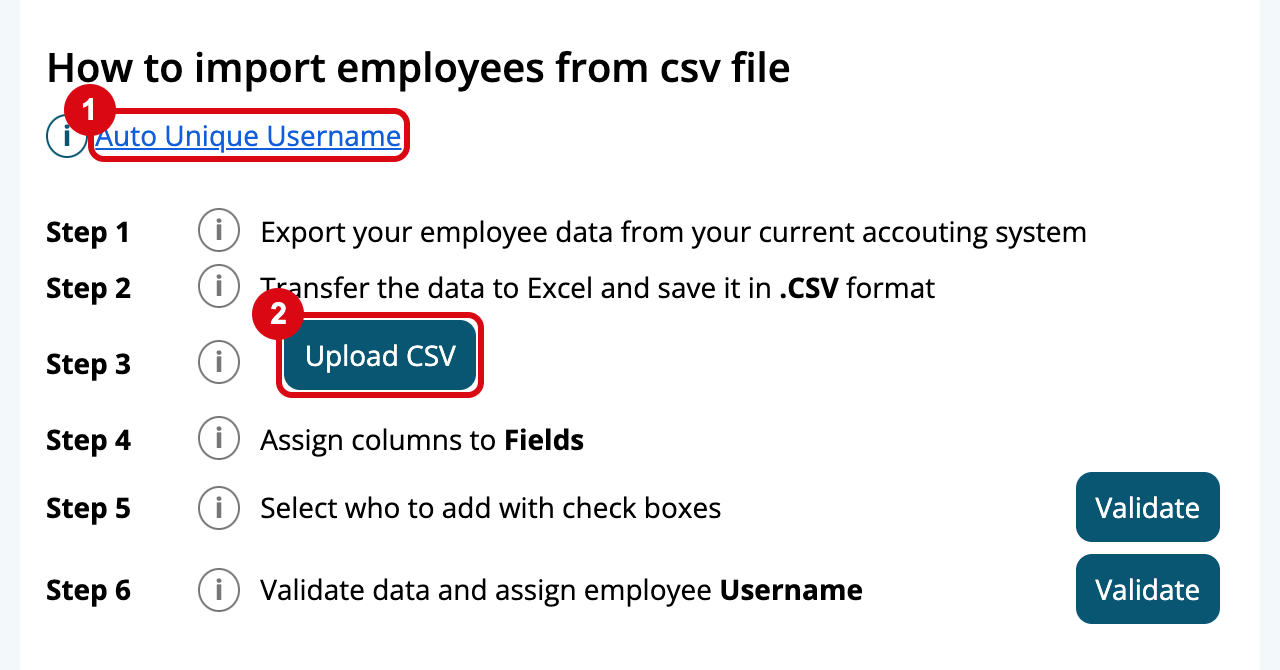
Usernames are unique across every Microkeeper business, so common names are often taken. Auto Unique Username adds a number to any username already in use, for example "jack_smith1". Without it, taken usernames are marked red for you to change.
Warning
Check every column's field before you click Validate. A heading that starts like another field's code can be matched to the wrong field. For example, a TFN declaration date column headed "tax_dec_date" can be matched to Tax Scale. Change it to TFND Sign Date, and set your tax scale column to Tax Scale.
Import staff from Xero
If your staff are in Xero Payroll, import them straight from Xero. Navigate to Menu > Settings > Employees, click Add Staff, then Import Staff via Xero. The Xero Staff Import page opens.
- Click Connect to Xero and sign in to Xero. If you're already connected, the page shows your Xero organisation's name instead.
- If you have more than 100 staff in Xero, choose a page under More than 100 staff?. Xero sends 100 staff at a time.
- Click Get employee data. Each employee in Xero is listed with a suggested username.
- Check each username, then click Add, or Skip for anyone you don't want to add.
- When you've finished, click Employees and complete any details Xero didn't have.
Microkeeper brings across each employee's name, email, mobile and phone, date of birth, gender, home address, start date and employment basis, their tax file number and tax details, up to three bank accounts, their super fund and member number, and the pay rate and ordinary hours on their Xero pay template. They're added to your Groups with Auto Add turned on, and given your default leave entitlements.
The import uses the Xero organisation connected to your first ABN. Usernames are unique across every Microkeeper business, so if one is taken, change it and click Add again.
Finish setting up your imported staff
- Pay cycles: if you imported from Xero, or didn't include a bulk_GID column, put each employee in their pay cycle Group. See Put staff in the right pay cycle.
- Pay: check each employee's rate and hours on their profile. See Set the employee's pay.
- Welcome letters: imported staff aren't sent a login. Send their welcome letters from Onboarding Review: see Onboarding.