Jobs
The Jobs feature allows employees hours to be assigned to particular jobs allowing the ability to perform cost centre analysis on those hours.
Navigate
Menu > Manage > Jobs
What are Jobs?
The Jobs feature is designed to track hours worked by employees, enabling Cost-Centre analysis for organisations. Jobs are commonly used for:
- Hour Tracking: Monitoring the time employees spend in various departments, locations, projects, etc.
- Cost-Centre Analysis: Evaluating how employee hours are distributed across different sections of the organisation.
- Productivity Insights: Determine which parts of the business is most profitable based on time allocation.
- Variable Pay Rates: Different rates can be applied to different jobs using Payroll Rules.
Turning Jobs Settings On
The Jobs module must first be enabled in the Global Settings.
Navigate to Menu >Settings > General > Global > System Settings
Enable Jobs under the Jobs settings.

Adding a new Job
To add a new job, click the Add New Job bottom.
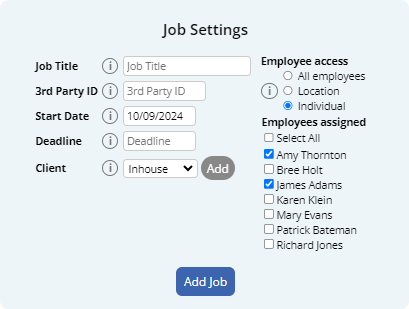
Configure the new job with details:
- Job Title (Required): Enter a descriptive name for the job. This is what employees will see when selecting a job to clock onto.
- 3rd Party ID: If you use an external system for tracking jobs or projects, you can enter its identifier here for cross-reference.
- Start Date (Required): Set the date from which this job becomes active in the system. Employees cannot clock onto the job before this date.
- Deadline: If the job has a specific end date or deadline, enter it here. This can help with project planning and resource allocation.
- Client: Select the client associated with this job from the dropdown menu. Choose "Inhouse" for internal jobs. You can add a new client by clicking the "Add" button if needed.
- Employee access: Choose who can access this job:
- All employees: Every employee in your organization can clock onto this job.
- Location: Only employees within range of Locations configured with this job can select this job.
- Individual: Manually select which employees can access this job.
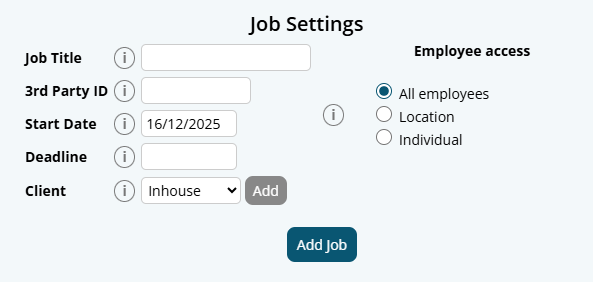
Once you have completed the form click the Add Job button to confirm your new job.
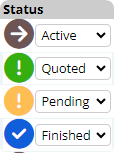
Configuring the Status of the Job
Newly added jobs will be set as a Quoted Status. Quoted Jobs won't be available to employees until they are set to Active.
Use the drop down selection of any job to set the Status to Active when a job is ready to be used.
Adding Job Details
Job Details can be used to add a detailed description of the job. Click the Details edit button to open the Job Details window.
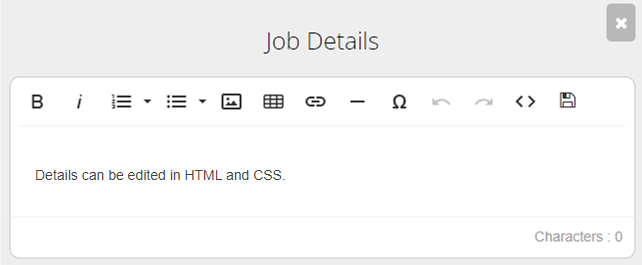
Job details can be viewed by employees when reviewing their rosters.
Job Tracking Methods
There are multiple methods for tracking hours:
| No. | Tracking option | Details |
| 1 | Default Employee Job | A default Job can be applied to automatically track hour costs to a specific Job. This method will be overridden by any of the other options. |
| 2 | Fingerprint Scanner | You can specify directly into the Fingerprint Scanner Software which job is to be assigned to the employee's that clock on with that Scanner. |
| 3 | Rostered Job Tracking | If the location that an employee is rostered onto has a job assigned to it, the employee's hours for that shift will be assigned to that Job. |
| 4 | Employee Job Tracking | When clocking on the employee will manually select which job they are clocking onto. The list of available jobs to select from can be customised. |
| 5 | Manual Job Entry | The job is entered manually into the timesheet once the shift is complete. |
Each of these methods will require set-up as described below.
If you're unsure of what to select contact Microkeeper for assistance.
Default Job to Timesheet entries
A Default Job can be setup on an Employee's Profile to allow the system to automatically track their Timesheet hours to a specific job if no job is detected by the system.
Default Job tracking needs to be enabled in the Global settings.
Navigate to Menu > Settings > General > Global > Timesheet Setting - Default Job to Timesheet
Select the Default Job to Timesheet setting.

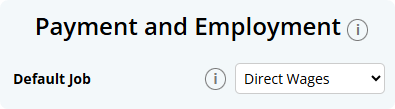
A Default Job can then be set on the Employee's Profile.
Navigate to Menu > Settings > Employees > Edit the selected Employee.
Under the Payment and Employment - Default Job, select the job to be default.
Fingerprint Scanner Job Tracking
When setting up the Fingerprint Scanner, you can enter a Job ID. This is best for when you have multiple fingerprint scanners at multiple sites or departments.
You can only track a single job from a single fingerprint scanner.
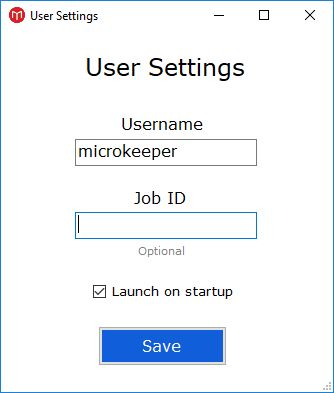
To set it up click on the hamburger menu in the top left of the Microkeeper Timesheet Software installed on your device.
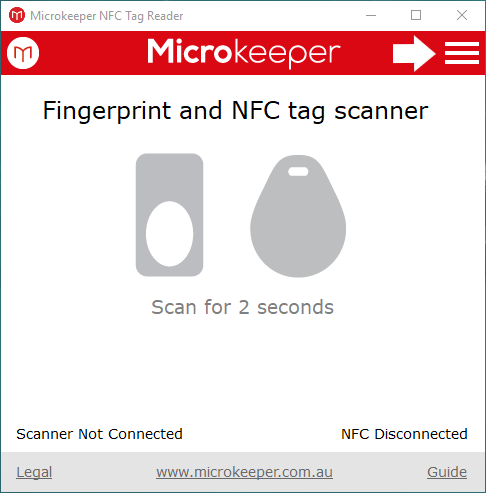
Click Settings, which will bring up the below window, you can then enter the Job ID.
This will assign all hours clocked with this device to that Job.
To find the Job ID, Navigate to Menu > Manage > Jobs.
Then in the list of jobs, hover the mouse over the ID number of the job you wish to track, and a small box containing the Job ID will appear. EG The below Job ID is 1234.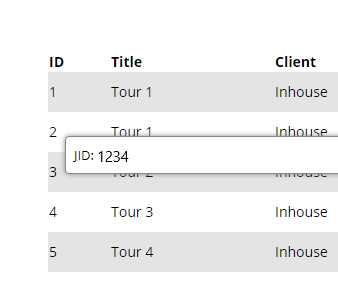
Roster Job Tracking
When tracking jobs via the roster, you will assign a Job to the Locations within your roster.
Then when rostered onto the Location that has a Job assigned to it, all clocked hours by that employee will be automatically assigned to that Job.
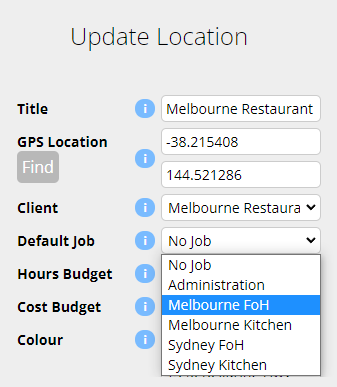
Navigate to Menu > Settings > General > Locations > edit the Location you wish to add Job tracking to.
Change the Default Job value to the selected Job you want to track the rostered shifts of that Location to.
Then roster onto your locations as normal, and the hours clocked at each location will be assigned to the corresponding job automatically.
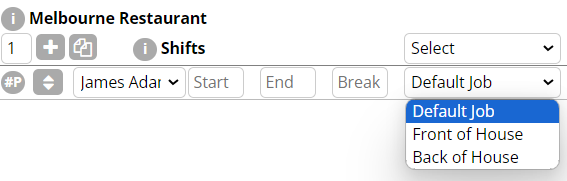
Dynamic Roster Job Tracking
A Location can be assigned multiple jobs to allow for dynamic job tracking when Rostering. A Client is used to associate and group up Jobs together.
Set up a new Client
Navigate to Menu > Manage > Clients
Setup by clicking the Add Client button

Fill in the Add Client form. Only a Business Name or Contact Name is required.
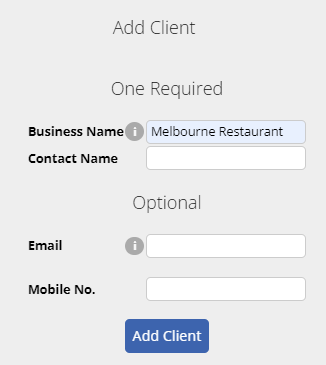
Click Add Client to complete the form.
Attach Jobs to the Client
With a Client now created, we can start to assign Jobs to our new Client.
Navigate to Menu > Manage > Jobs
Edit a Job's Settings and assign a Client to the Job. Update Job to confirm changes.
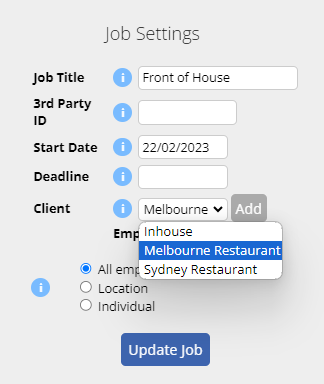

The Jobs are now associated to the Client
Attach the Client to the Location
Now that we have the Clients associated to our Jobs we can attach this to our Location.
Navigate to Menu > Settings > General > Locations
Edit the Location that needs dynamic Job assignment and assign the client to the Location. Update Location to confirm changes.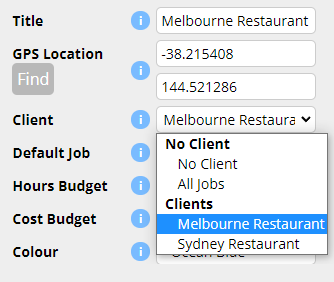
Now when we roster to that Location, multiple jobs can be selected from and assigned to the rostered shift.
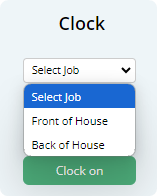
Employee Job Tracking
Employee Job Tracking allows employees to select which Job they are on when they clock in or out. The feature is useful for businesses where employees may work on multiple jobs or at various locations throughout their workday.
A Jobs employee access can be configured to:
- All Employees - All employees can clock onto this job.
- Selected Employees - Manually select which employees can access this job.
- Location Proximity - Only employees within range of Locations configured with this job can select this job.
Configuring Selected Employees for Employee Job Tracking
A job can be configured to restrict access to only selective employees.
To configure this option:
- Set up/Edit the Job with Employee Access - Individual.
- Select the employees to assign to this job.
Only the employees assigned to the Job will be able to select that job when clocking in.
Configuring a Job to be Selectable by Location Proximity
A job can be configured to only allow employees to clock in if they are within the GPS radius of the Location the job is assigned to.
To configure this option:
- Set up the Job with Employee Access - Location
- Attach the Job to the Location and configure GPS coordinates
- Navigate to Menu > Settings > General > Locations
- Edit the designated location.
- Attach Job (or Client) to the location.
- Ensure Latitude and Longitude has been set up in the location.
The employee will now be able to clock into the job if they are within the GPS radius of the configured location.

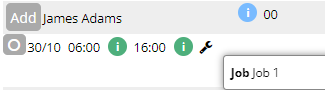
Manually adding Jobs to the Timesheet
To add a Job to a shift in the timesheet, modify the shift by clicking on the Date, or Time of the shift.

Then add a job in the Update Shift form.
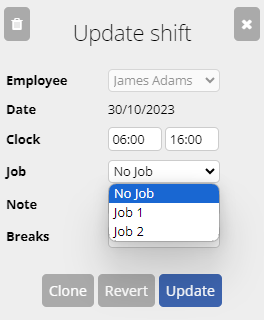
Clicking update will complete assigning the Job to the shift
Hours worked on Jobs
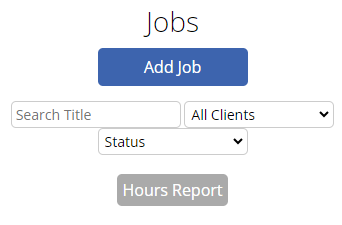
Hours can be reviewed and analysed through the Hours Report located on the Jobs page.
Navigate to Menu > Manage > Jobs > click the "Hours Report" button to generate a Hours Worked on Job report.
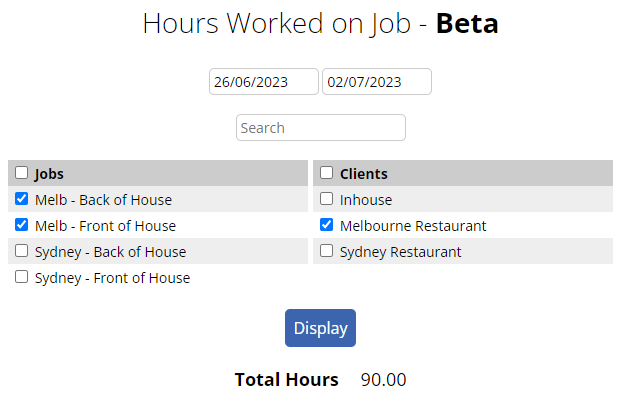
Select a period of time to view the Hours Worked on Job report using the Date selection and then click "Search for Jobs" to generate the results.

The Hours Worked on Job page will display a list of all Jobs and Clients that were recorded for the period searched.
Select the Client or Jobs to be displayed by using the check boxes located to the left. Click the "Display" button to view the selected options.
The Hours on Jobs Reports Breakdown
There are 4 reports available to be viewed.
Job Hours Report This report displays the total hours for each job selected.
| Job | JobID | Client | Hours |
|---|---|---|---|
| Melb - Back of House | Melbourne Restaurant | 30 | |
| Melb - Front of House | Melbourne Restaurant | 60 |
Employee Hours Report This report details individual employee total hours for each job selected.
| Employee | Job | JobID | Hours |
|---|---|---|---|
| Amy Thornton | Melb - Front of House | 30 |
Notes Report This report groups unique notes and the total hours with the same note on the timesheet.
| Note | Hours |
|---|---|
| Started Late | 60 |
Full Shift List Report This report lists the comprehensive shift information for each employee's shift.
| Employee | Job | Job ID | Client | Date | Clock On | Clock Off | Breaks Taken (min) | Notes | Hours |
|---|---|---|---|---|---|---|---|---|---|
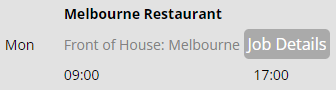
| Amy Thornton | Melb - Front of House | Melbourne Restaurant | 26/06/2023 | 09:00 | 17:00 | 30 | Started Late | 7.5 | |
| Bree Holt | Melb - Front of House | Melbourne Restaurant | 26/06/2023 | 09:00 | 17:00 | 30 | Started Late | 7.5 | |
| James Adams | Melb - Back of House | Melbourne Restaurant | 26/06/2023 | 09:00 | 17:00 | 30 | Started On Time | 7.5 |
Job Cost Reports
Tracking hours may not be enough, the business may need to also track the costs of those hours. For example, Overtime, Penalty Rates etc.
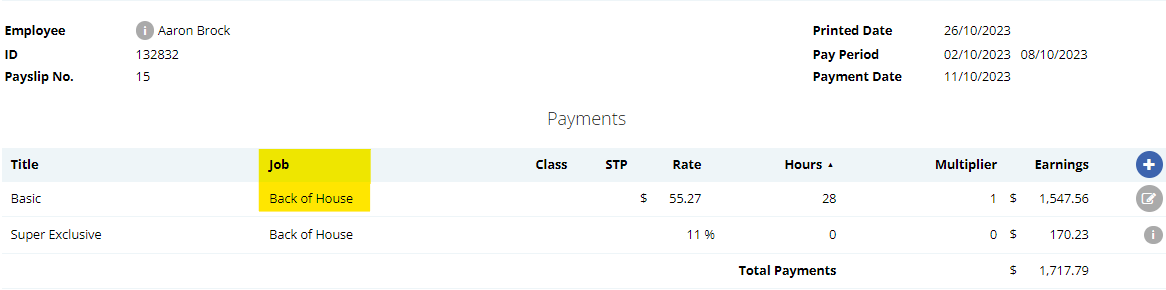
Enable Job tracking to Payslips
Navigate to Menu > Settings > General > Global - Payroll Settings > Payroll Breakdown - Enable "Job" payroll breakdown.

From the time this is updated, the Payruns will now have the job displayed on the payslip.
Job Costing Report Formats
Navigate to Menu > Payroll > Reports
Then select the drop down box to the right of the Report format you wish to view and select the format you wish to receive the Report in.
The report format options are:
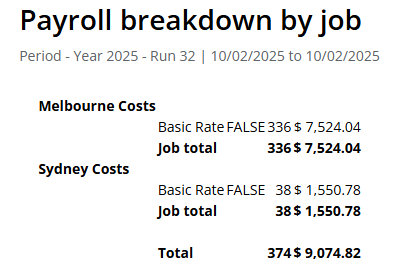
Payroll Breakdown by Job:
This report shows all payment item costs broken down by the Jobs for that period.
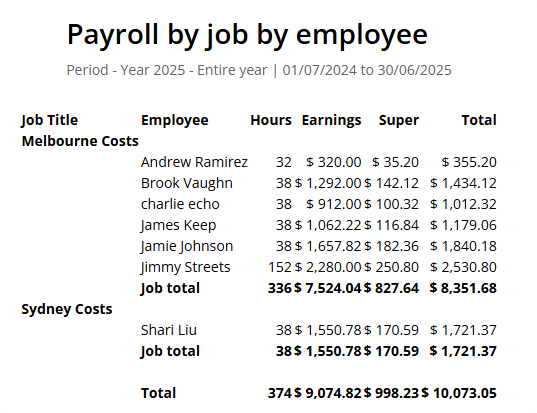
Payroll by Jobs By Employees:
Informs you how much each employee is costing each job.
Super Breakdown by Job:
