Personal Files
Personal Files in Microkeeper let you create, issue, and manage documents that are unique to an individual employee.
This guide will help you understand how to set up templates, issue files from an employee profile, and manage signing and clock-on requirements.
Navigate
Templates:
Menu > Settings > Personal File Templates
Issue and manage files for an employee:
Menu > Employees > open an employee profile > Personal Files
What are Personal Files used for?
Personal Files are used for documents that are unique to an individual employee. Examples include:
- An employment contract with employee-specific terms
- A disciplinary letter or performance review
- An incident report form
Personal Files are useful when a manager needs to complete sections of a document before issuing it. For example, a performance review may use a standard template, but the manager adds employee-specific feedback, goals, and comments before it is shared or signed.
If the same document is used for multiple employees and only personal details (such as their name or address) change, or if the employee is required to upload a document, use Skills instead.
Access Required
Personal Files use HR access:
- HR - Full: View and manage Personal Files on employee profiles
- HR - Config: Includes all HR - Full permissions, plus the ability to create and manage Personal File Templates
Personal File Templates
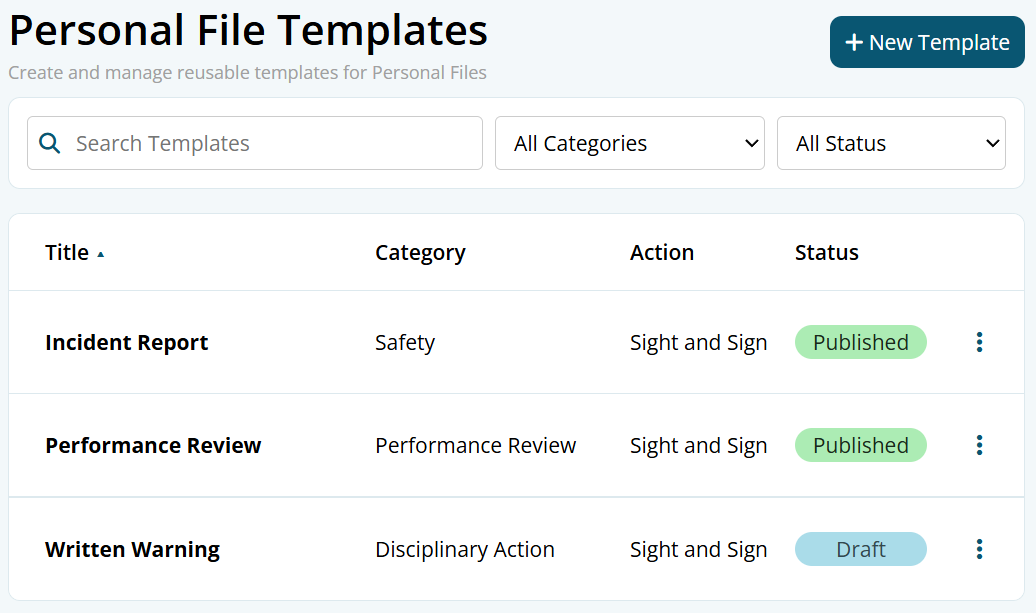
Templates save time when you issue the same style of document to multiple employees.
Template content can also include employee profile variables that are filled in when the file is issued.
Creating a Template
- Navigate to Menu > Settings > Personal File Templates
- Click New Template
- Enter a title for the template
- Optionally start from a blank template, one of your templates, or a Microkeeper template
- Click Add Template to open the template editor
Configuring the Template
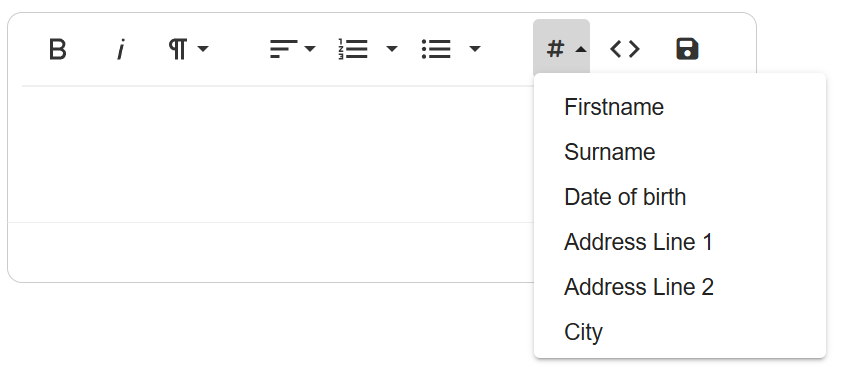
After creating a template, configure:
- Title: The name of the template
- Category: Used when filtering templates and issued files (for example Employee Contract, Disciplinary Action, or Personal File)
- Default Action:The action applied when the template is used to create a Personal File
- Reference Only - Staff can view the file. No signature is required
- Sight and Sign - Staff must view and sign the file
- Critical - Staff must sign the file before they can clock on
- Admin Only - Visible only to admin staff. Hidden from the employee
- Status:
- Draft or Archived - The template will not be available when creating Personal Files
- Published - Available when creating Personal Files
- Document Content: Use the rich text editor for the document body
Employee Profile Variables
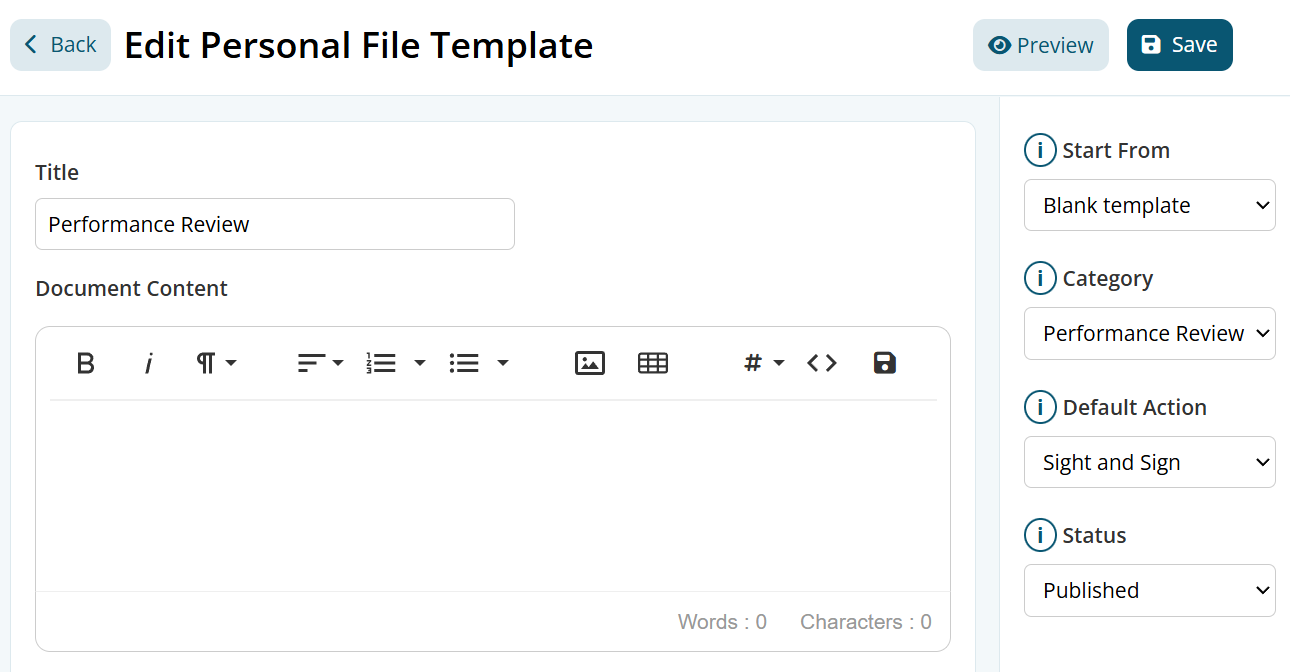
Use the variables dropdown in the editor to insert dynamic employee information. Available variables include:
- {firstname}: Employee's first name
- {lastname}: Employee's last name
- {dob2}: Date of birth
- {address}: Address Line 1
- {address2}: Address Line 2
- {city}: City
- {state}: State
- {postcode}: Postcode
- {phoneno}: Mobile number
- {email}: Email address
- {position}: Job position
- {startdate2}: Start date
- {primary_manager}: Manager's name
- {rate}: Default pay rate
- {basichours}: Weekly ordinary hours
- {status}: Employment type
- {custom_*}: Custom employee profile fields (if applicable)
Placeholders are resolved when a file is issued to an employee.
Save your Template
When you have finished drafting the document, click Save. Set the template Status to Published when it is ready to use.
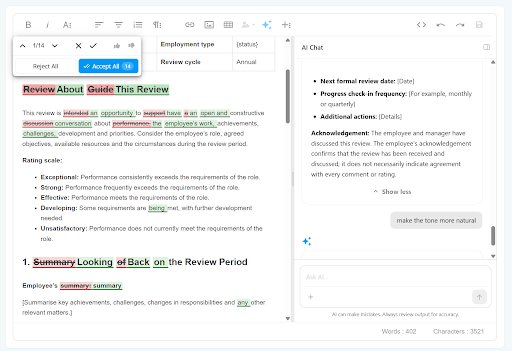
AI Chat Assistant
The AI Chat Assistant is available on the Enterprise plan. Use it in the document editor on a Personal File Template or an issued Personal File to draft, rewrite, or format the document.
- Open the template or Personal File
- In the editor toolbar, click the sparkles icon to open the AI Chat Assistant
- Ask for a draft, or ask it to rewrite or format the content already in the editor
- Review the suggestion, then click Apply
Issuing a Personal File
Personal Files are issued from the employee profile.
- Open the employee profile
- Go to the Personal Files section
- Click the plus button
- Choose how to create the file:
- Blank File - Start with an empty document
- Your Templates / Microkeeper Templates - Copy content from a published template
- Existing files - Copy from an existing Personal File already issued to this employee
- Enter a title
- Click Add Personal File
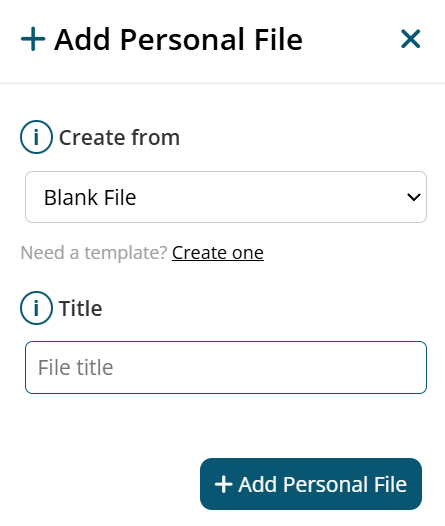
You will be taken to the Personal File editor to complete the document and settings.
Configuring an Issued Personal File
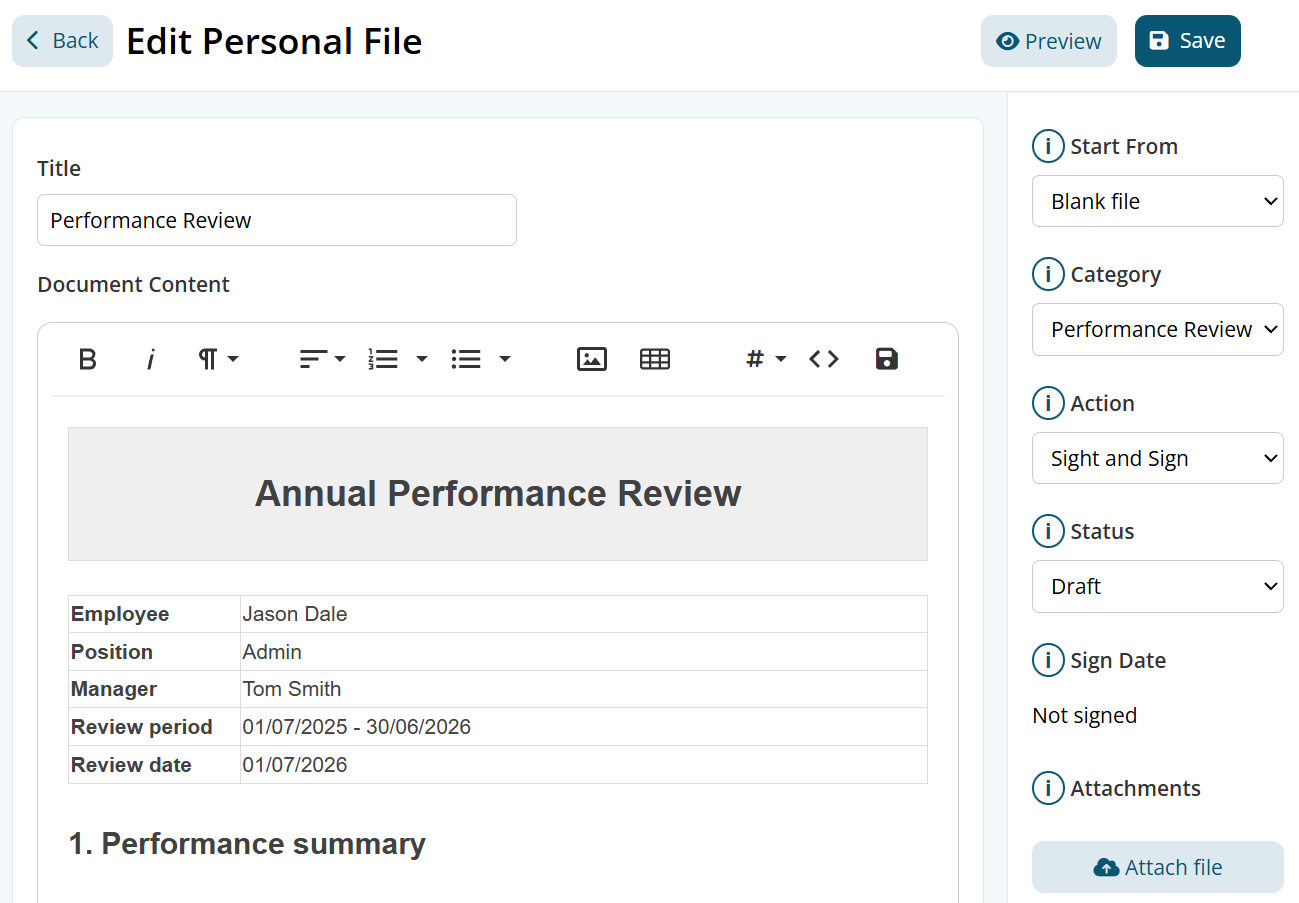
On the Personal File edit page you can manage the document content and file settings.
1. Document Content
- Title: The name shown on the employee's Personal File
- Document Content: Use the rich text editor for the document body
- Start From: Replace the editor content with a blank file, a template, or another Personal File for this employee. Title and status are not changed
- Attachments: Optionally attach supporting files in addition to the document content
2. Category
Choose the appropriate category for filtering, for example:
- Awards
- Certificates
- Disciplinary Action
- Employee Contract
- Performance Review
- Personal File
- Position Description
- Safety
- Workers Compensation
3. Action
- Reference Only - Staff can view the file. No signature is required
- Sight and Sign - Staff must view and sign the file
- Critical - Staff must sign the file before they can clock on
- Admin Only - Visible only to admin staff. Hidden from the employee
4. Status
- Draft - Not visible to the employee
- Published - Visible to the employee (based on the Action). Staff can view and sign when required
- Archived - Hidden from the active list and not visible to the employee
Use Preview to see how the file appears before publishing.
Employee Review and Signing
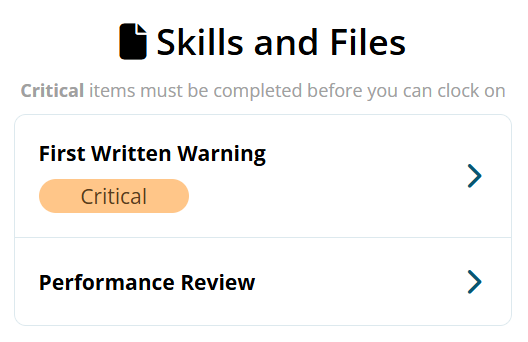
Once a Personal File is Published, employees can open it from their Employee Console under Skills and Files.
- Open the Personal File
- Review the document content
- View any attached files if present. Attachments must be viewed before signing
- If a signature is required, click Sign Document, draw your signature, then click Save
- Complete the declaration and submit
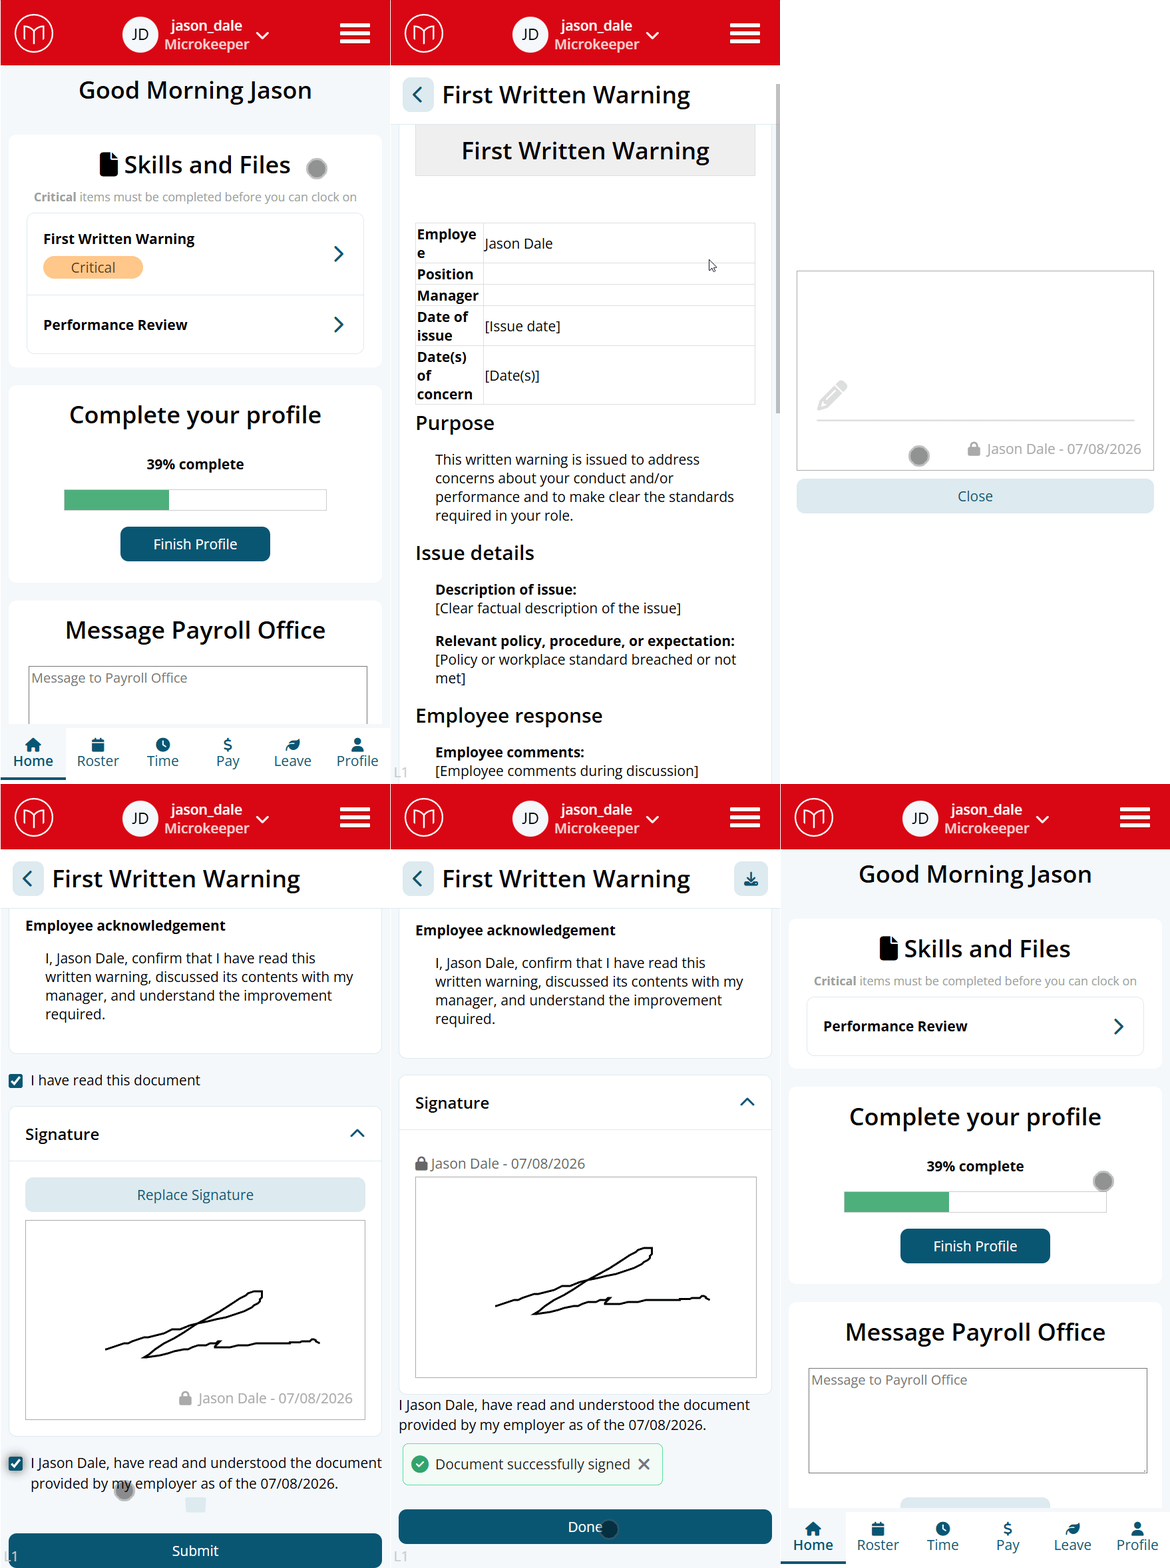
After a file is signed, the document content cannot be changed. Category and Status can still be updated by HR.
Critical Files and Clocking On
If a Personal File is set to:
- Status: Published
- Action: Critical
the employee must sign the file before they can clock on. This works in the same way as Critical Skills.
If unsigned Critical files exist, clock-on is blocked and the required file titles are shown.
Managing Personal Files on the Employee Profile
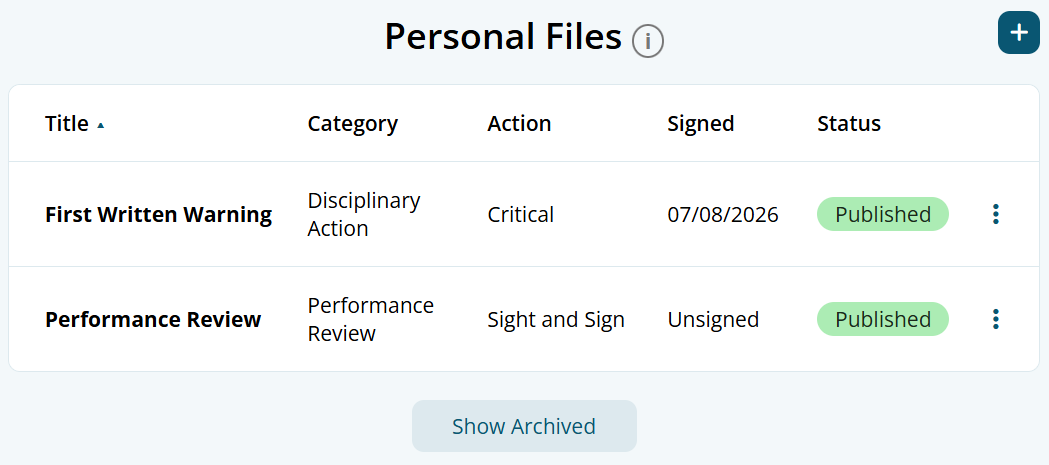
The Personal Files list on the employee profile shows each file with:
- Title
- Category
- Action
- Status
- Signed date (or Unsigned)
Use the row menu to edit a file, archive it, or unarchive it. Archived files can be shown using Show Archived.